The steps here are going to assume you’re working on an Umbraco 8.x project.
Create a new ASP.NET Web Application project, targeting .NET Framework 4.7.2. Leave it empty as we’ll be installing our packages manually. I typically name the project with a suffix of Web, so it would look something like MyProject.Web.
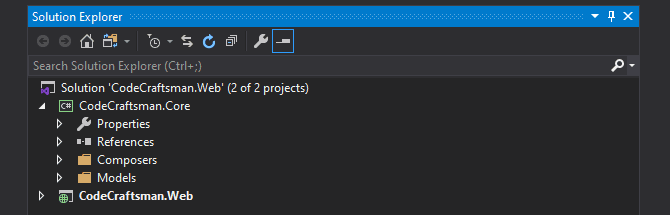
Now add a Class Library project, also targeting .NET Framework 4.7.2. Again, name the project with a suffix, but this time use Core, resulting in something like MyProject.Core. I drop a Models and Composers folder in there also, because I always end up extending those features.
Be sure to add a reference to the class library project from your Web project.
Now let’s use NuGet Package Manager to install the UmbracoCms package into our Web project; this ensures the packages become part of the VS project file. This is important for any continuous integration that performs a build on the project remotely.
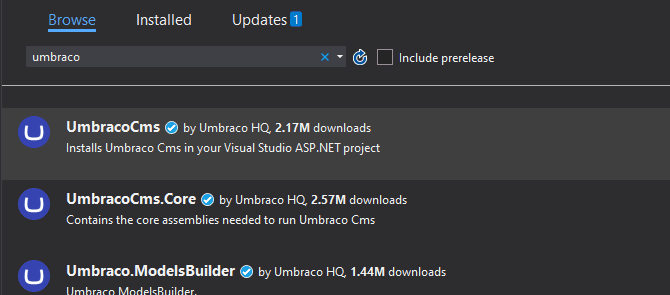
Once installed you should see the nifty message below:

We need to make an important change to the Web.config file. Add the following settings to the <appSettings> section:
<add key="Umbraco.ModelsBuilder.Enable" value="true" />
<add key="Umbraco.ModelsBuilder.ModelsMode" value="AppData" />
<add key="Umbraco.ModelsBuilder.AcceptUnsafeModelsDirectory" value="true" />
<add key="Umbraco.ModelsBuilder.ModelsDirectory" value="~/../MyProject.Core/PublishedModels" />
These settings are key to a smooth development experience because it tells Umbraco to generate partial class models of any created Document Types right in your class library. This allows you to work with the Document Types as strongly-typed classes 😄.
Be sure to create a
PublishedModelsfolder in your class library project as this is where the model class files will get generated.
In order for the models to compile correctly in your class library we need to reference some of the Umbraco assemblies. I prefer to reference them directly from the packages installed in the Web project so there’s no version conflicts. Right-click References in your Core project and Add Reference then use the Browse button to add each of these:
MyProject.Web\packages\UmbracoCms.Core.8.6.4\lib\net472\Umbraco.Core.dllMyProject.Web\packages\UmbracoCms.Web.8.6.4\lib\net472\Umbraco.Web.dllMyProject.Web\packages\UmbracoCms.Web.8.6.4\lib\net472\Umbraco.ModelsBuilder.Embedded.dll
Login to the backoffice and open the Settings > Models Builder. Click Generate Models.

Hop back into VS and hit the Show All Files toggle if you don’t have it enabled already. Expand the PublishedModels folder in your Core project and you should see several *.generated.cs files. Select them all and Include in Project.
Try a rebuild on the Core project.
You’re now ready to start developing customizations to your Umbraco site.